A colony of Easter Bunnies!

Digi images from Digistamp Boutique

Bunny rabbits galore!

Felt inspired to make some Easter cards – with enough time to get them posted before Easter!
I love these bunny images. They are coloured with promarkers, then I tried to make each one different – because that’s much more fun than making 6 all the same.

Easter card

This is my favourite – and it’s made only using paper. I took a lilac polka dot card blank, added a scrap of pink polka dot card and a scalloped circle cut on the BigShot. I embossed the circle to make that dotty too and to add a bit of texture.

The flowers and butterflies are cut using a hand punch. I drew freehand on them with a fine sharpie pen, and added colour with the promarkers. The flower stalks are just green card strips, drawn on with the fineline sharpie. The flower pots are also drawn freehand and cut out. I wrote the greeting by hand too.

Easter card 2

This is my other favourite, and it used up lots of ribbon scraps which is a bonus! I don’t know where the butterfly came from – I found it in the box of potentially useful bits and bobs which gets bigger and bigger by the day! The greeting is hand stamped.

I hope you like my cards, and I’d like to take this opportunity to wish you a happy Easter – hopefully there will be (chocolate) bunnies waiting for you on Easter morning.

Leave a comment

Filed under cardmaking

How to stick things on straight

I’m currently making a batch of wedding invitations and my friend was so impressed with my getting things straight method I thought I would share it!

IMG_0740

This is what I’m making – 85 of them and they have to be identical! It’s actually a very simple card, but one which looks rubbish if you make it wonky. (Wonky has its place – maybe I’ll do a post on the merits of wonkiness another time!)
I didn’t want to draw guidelines on 85 card blanks – because that would mean having to erase 85 guidelines and because even with a great pencil, a great rubber and faint lines you are always going to risk nasty smudges.

And my method is so much easier than that.

You only need a sheet of plain paper, a ruler and a pencil.

IMG_0737

You need to draw a straight line near the bottom of the paper – that’s where you line up the bottom of your card blank. Then draw a line where you want to stick your hearts (or whatever else) on straight.

IMG_0738

Then I position my ruler along the top line – the level where the hearts go. I know where the centre of the card is by the measurements on the ruler – my middle point is on the 7cm mark.

IMG_0739

So that’s where I place my middle heart – I use little foam pads for a 3d effect.

IMG_0736

And my other hearts are placed at 2cm intervals – so there is one at 1cm, 3cm, 5cm, 7cm, 9cm, 11cm and 13cm. All you have to do is hold the ruler in place and you can see where you have to stick! (To make sure your card blank lies nice and flat wait until you’ve done the sticking before you fold it.)

So, I hope someone somewhere in the whole wide internet world finds that useful! Please leave me a comment if you do, or if you have another (better?) technique.

1 Comment

Filed under cardmaking

Scrapbooking – without supplies!

Of course, having scrapbooked for years I have mountains of paper, brads, ribbon, eyelets, stickers, stamps, sparkly bits, buttons and studs.

But I decided to set myself a challenge – could I scrapbook without using loads of stuff?

I took one 30cm square of card, some tape and some sticky pads. Then I added three photographs and a load of leaflets and tickets from a recent trip to Dublin.

Dublin 2015

Okay, I sneaked a few eyelets in there, but nothing else… The backing paper is cut from the tourist map.

IMG_0730

I made the backing paper into a pocket to store some more leaflets and memorabilia. And that’s it. You don’t need lots of expensive scrapbooking supplies to scrapbook successfully.

…But I think I’ll keep hold of all my stash anyway!

1 Comment

Filed under Uncategorized

30 days of creativity – day 15 – I knitted a mouse!

DSCF1743I’ve been neglecting my knitting needles to begin a love affair with my crochet hook.

But I’m trying to use up my yarn stash and this lovely soft fluffy yarn is absolutely awful to crochet with.

I decided to knit a bunny rabbit, no pattern as usual, but when I sewed the face  she decided to be a mouse. I stitched the floppy bunny ears into roundy mouse ears, made a tail and, there you go, a mouse!

I think she’s cute and I’m tempted to keep her, but have decided to donate her to my friend’s coffee morning in aid of breast cancer.

1 Comment

Filed under knitting

Crochet cardigan pattern

cardigan
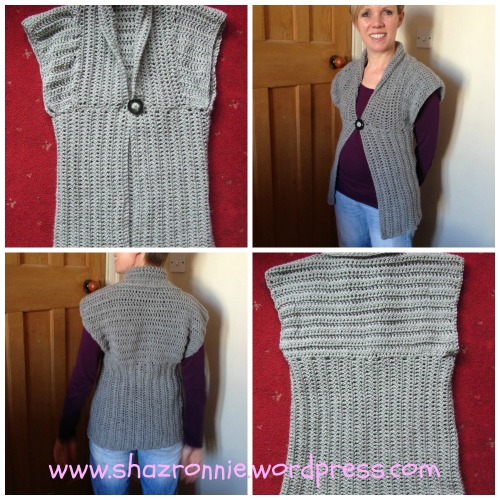
So, I designed a crochet cardigan!

Or, to be more specific, I made it up as I went along!

I used an aran yarn (it was a 400g ball, and I have some left) and a 6.5mm hook. I apologise for the lack of proper pattern wordage, but I don’t really follow patterns, let alone write them! I’m a size 8-10, but you could easily adjust this basic template to make the cardi bigger or longer.

There are three pieces – the collar, the bottom part, and the back, which folds over to become the two sides of the front.

I started with the collar piece.

Chain 103 stitches, turn and crochet 1 treble into the 3rd chain from hook. Make one treble crochet into each stitch of your chain.

At the end  chain 2, turn and go back the other way, making a treble into each stitch.

Continue until you have 10 rows of treble crochet. Cut yarn and tie off.

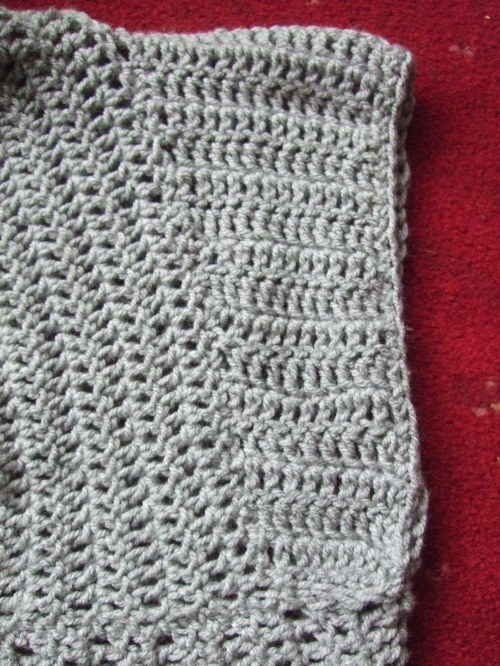
 Next I made the bottom piece.

Chain 83 stitches, turn and crochet 1 treble into the 3rd chain from the hook. Make one treble crochet into each stitch of your chain. At the end  chain 2, turn and go back the other way, making a treble into each stitch.

Continue until you have enough rows to go around under your bust. Mine was 54 rows of treble crochet.

Take the collar and attach it with a slip stitch to the ends of the bottom piece.  Mark the middle 26 stitches of the collar – this is where you will join the back piece.

(here’s a little drawing)

cardi

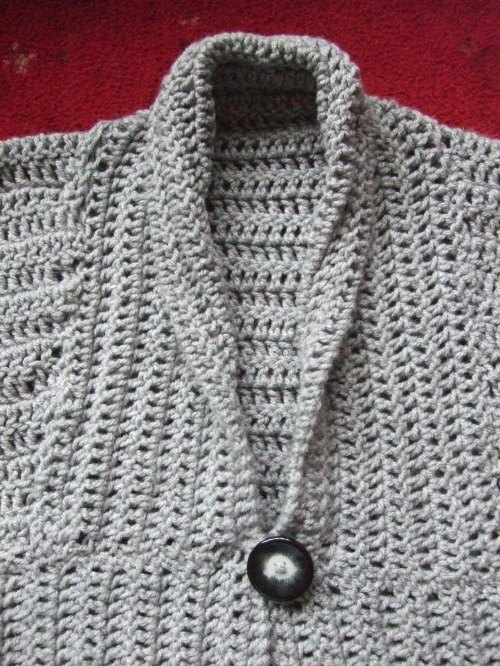
The collar just folds over when it is being worn.

Now you need to make 52 treble crochet along the middle of the bottom piece – this will be the back of your cardigan. I used some stitch markers to help me measure the middle section.

Carry on with rows of trebles until you have 18rows.

cardiback

Chain 2, turn and make 14 trebles in the next row. this is the point where your collar joins. (At this point I slip stitched my collar in place, using the markers I’d made earlier. )

Now you are on the front and need to make a triangular piece until it is long enough to join to the bottom.

Turn and crochet 14 trebles.

Turn, crochet 13 trebles, turn, 13 trebles.

(Each time I got to the collar edge I made a slip stitch to hold the crochet in place.)

Make one less treble in each block of two rows until you have 7 treble crochet in your row.

Join to the bottom piece with slip stitch.

So, hopefully it looks like this…

DSCF1705

Now, you need to do the same for the other front side; rejoin yarn and make 2 rows of 14 trebles, 2 rows of 13 trebles, etc. Join at the bottom.

Next I joined the edges properly with slip stitch – along the diagonal was a bit holey!

Then I edged around the bottom and around the armholes in slip stitch.

Finally I sewed on a button and made a button loop with a crochet chain.

DSCF1706Well, that was probably as clear as mud, but hey-ho! I really should have written it down as I did it.

My favourite thing about crochet is the way you can make it up as you go along, so, go on, have a try!!


Leave a comment

Filed under crochet, Uncategorized

30 days of creativity – day 14 – a wedding card

 youngloveIt’s that time of year – wedding season!

I love this stamp from Lili of the Valley – the two children remind me of my daughter and her best friend.

I coloured the image with promarkers, and drew faux stitching around the edges. I couldn’t resist adding the paper doily as a lacy background. The bunting is also stamped and hand coloured.

The words are hand stamped, and I love these tiny wooden heart buttons.

1 Comment

Filed under cardmaking, paper, wedding

30 days of creativity – day 13 – an easy peasy Easter card

Lots of people think cardmaking is hard, when the truth is it’s as easy as you want it to be!

There are loads of ideas and inspiration all over the web, and I found these cute bunny printables via pinterest.

(I know, I have broken an unwritten internet law – thou shalt not ever actually make or do something you pinned on pinterest.)

You can find the bunnies here and all you need to do is print them out.

bunnybunnybunnyI cut around mine with some teeny scissors – that was the hardest part of making this card – then glued them onto a 14cm square piece of patterned paper. I drew a black line around the edge because I like black lines. I stuck this onto a 15cm square white card and finished the cuteness off with some teeny pompoms I stole from found in my daughter’s art box. I stuck them on with silicone glue.

And there you go, easy peasy!


1 Comment

Filed under cardmaking

Relax… it’s mother’s day! (soon!)

mumbathEvery mum knows that the key to happiness is an undisturbed dip in the bath – glass of wine in hand makes it even better!

This is the card I have sent to my own mum, I know she was so happy when we finally got a lock on the bathroom door!

The image is from jellypark and I have coloured it with promarkers. I think the papers are from Dovecraft, and the ribbons are from my ribbon drawer!

Linking up with the jellypark challenge blog for this month’s challenge.

3 Comments

Filed under cardmaking, Challenges, digi stamp

Paleo chocolate cake – success at last!

paleocakeI have been (more or less) following a paleo diet since November.

Simply speaking, paleo means no grains = no wheat, corn, oats, pasta, rice. So regular cake is not really on the menu!

This is not my first attempt at paleo cake, but it is the most successful so I thought I would share with you.


Pre-heat the oven to 180 degrees and grease and line an 8 inch baking tin.

Melt 100g butter (or you could use coconut oil if you wanted to go dairy free) and stir in 75g dark chocolate until it melts. Leave to cool.

Whisk 4 eggs with 50g honey until they are creamy and well aerated.

Pour the cooled chocolate butter mixture in slowly, while whisking all the time.

Mix 100g ground almonds with 40g coconut flour and a teaspoon baking powder. Fold this dry mix into the wet mix.

Pour batter into cake tin and bake for approximately 30 minutes, until a skewer comes out clean.

Allow to cool, then if you like, drizzle with some more melted dark chocolate.


Enjoy! But not too much, this is a treat, even if it is grain free!


3 Comments

Filed under baking

30 days of creativity – day 12 – teacher’s survival kit

(I know, I know, it’s far too soon to be thinking about the end of the school year but my brain runs off without me and I just have to make these things!)

teacher survival items

Take a bunch of seemingly arbitrary items – a glass jar, a little chocolate, cotton wool balls, a birthday candle, elastic band, marbles and a safety pin…

teacher survival tag

Add a handmade gift tag to explain the seemingly arbitrary items…

teacher survival kit jar

Put items in glass jar – and hey presto! A cute gift for your teacher at the end of term!

(Must remember about these in July!)

1 Comment

Filed under Uncategorized